3 Designing the BIM Project Execution Planning Process
After each BIM Use is identified, it is necessary to understand the implementation process for each BIM Use and the implementation process of the project as a whole. This chapter describes a procedure to design the BIM Project Execution Process. The process map developed in this step allows the team to understand the overall BIM process, identify the information exchanges that will be shared between multiple parties, and clearly define the various processes to be performed for the identified BIM Uses. The use of process mapping techniques allows the team to effectively perform this step. These process maps will also serve as the basis for identifying other important implementation topics including contract structure, BIM deliverable requirements, information technology infrastructure, and selection criteria for future team members.
Mapping the Project Execution Process
Mapping the BIM Process for the project requires the project team to first develop an overview map which shows how the different BIM Uses will be performed. Then, detailed BIM Use Process Maps are developed to define the specific BIM implementation at an increased level of detail. To implement this two-level approach, Business Process Modeling Notation (BPMN) has been adopted so that consistently formatted process maps will be created by the various project team members.
Level 1: BIM Overview Map
The Overview Map shows the relationship of BIM Uses which will be employed on the project. This process map also contains the high-level information exchanges that occur throughout the project lifecycle.
Level 2: Detailed BIM Use Process Maps
Detailed BIM Use Process Maps are created for each identified BIM Use on the project to clearly define the sequence of various processes to be performed. These maps also identify the responsible parties for each process, reference information content, and the information exchanges which will be created and shared with other processes.
Creating a BIM Overview Map
This section details out how to create a BIM Overview Map.
1) Place potential BIM Uses into a BIM Overview Map
Once the team identifies the BIM Uses for the project (refer to the BIM Use Selection Worksheet from Chapter Two), the team can start the mapping process by adding each of the BIM Uses as a process within the map. It is important to understand that a BIM Use may be added to the overview map at several locations if it is performed at several times within the project lifecycle.
To help achieve this task, a template Microsoft Visio file containing process maps is published at the BIM Project Execution Planning Guide Website. A Microsoft Visio Stencil file is also posted in the same location and can be used by the project team to easily develop the process maps. If the project team members do not have Microsoft Visio, the team could use other process mapping or graphics software to develop the process maps. Additionally, versions of the templates are in Appendix D – Template Process Maps.
2) Arrange BIM Uses according to project sequence in the BIM Overview Map
After the project team has established the BIM processes that will be implemented on the project, the team should sequentially order these processes. One of the purposes of the Overview Map is to identify the phase for each BIM Use (e.g., Planning, Design, Construction or Operation) and provide the team with the implementation sequence. For simplistic purposes, the BIM Uses should be aligned with the BIM deliverables schedule.
3) Identify the responsible parties for each process
Responsible Parties should be clearly identified for each process. For some processes, this may be an easy task, but for others, it may not. It is important in all cases to consider which team member is best suited to successfully complete the task. Additionally, some processes may have multiple responsible parties. The identified party will be responsible for clearly defining the information required to implement the process as well as the information produced by the process.
The graphical notation and information format for the processes within the BIM Overview Map are included in Figure 3-1. Each process should include a process name, project phase, and the responsible party. Each process should also include a ‘Detailed Map’ title which points to the detailed map (Level Two map) for the process. This detailed map notation is used since several processes may share the same detailed map. For example, a construction management company may perform cost estimating from the building information provided by the designer. The Construction manager may perform this estimate during the schematic design, design development, and construction document phase, but it may utilize the same detailed workflow to accomplish this task, which can be represented in a single detailed map. Therefore, the process for performing the three estimates would be added into the high-level map at three locations, but the team could reference a single detailed map for further information.

4) Determine the Information Exchanges required to implement each BIM Use
The BIM Overview Map includes the critical information exchanges which are either internal to a particular process or shared between processes and responsible parties. In general, it is important to include all information exchanges that will pass from one party to another. In current applications, these exchanges are typically implemented through the transfer of a data file, although it could also include the entry of information into a common database. All the information exchanges identified in the BIM Overview Map should be detailed as defined in Chapter Four.
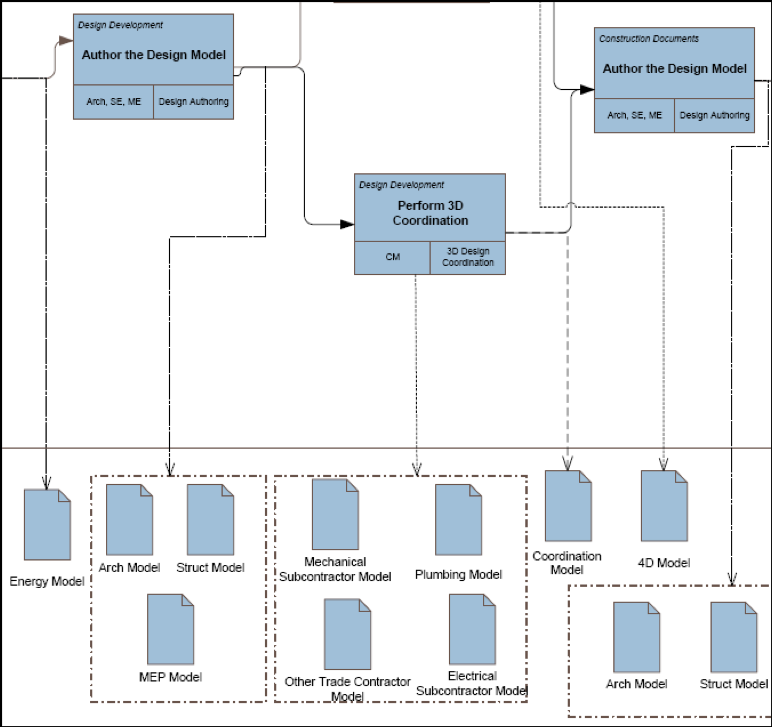
The exchanges which originate from a process box are exchanges which are internal to a process. The exchanges which originate or flow into the sequence line are external exchanges which are shared between high-level processes. For example, Figure 3-2, shows information exchanges originating from the ‘Perform 3D Coordination’ process box for the Laboratory Project. These exchanges, although internal to the 3D Coordination Process, should be identified in the BIM Overview Map since multiple parties author the exchanged information. This ensures that the exchanges will be detailed using the information exchange definition procedure described in Chapter Four.

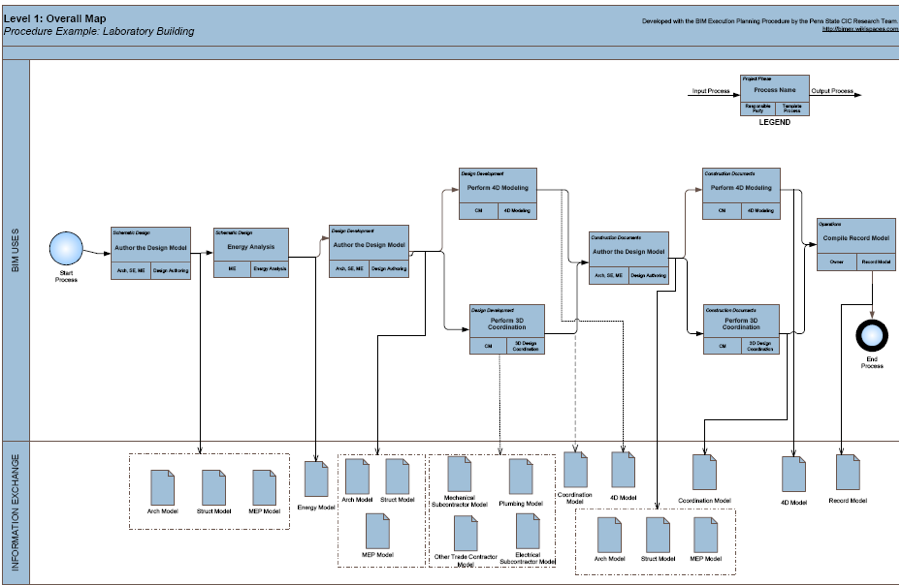
To illustrate the results of an overview mapping task, the BIM Overview Map for the Laboratory Project defines the overall BIM Uses that the team has employed for the project which are Design Authoring, Energy Analysis, 4D Modeling, 3D Design Coordination, and Record Modeling (reference Figure 3-3). It identifies that Energy Analysis will be performed during the schematic design phase, whereas 4D Modeling and 3D Design Coordination will be performed during design development and the construction document phases. The map also identifies the key Information Exchanges that are shared between different parties.

Creating a Detailed BIM Use Map
After creating an Overview Map, a Detailed BIM Use Process Map must be created for each identified BIM Use to clearly define the sequence of the various processes to be performed within that BIM Use. It is important to realize that each project and company is unique, so there may be many potential methods that a team could use to achieve a particular process. Therefore, these template process maps will need to be customized by project teams to achieve the project and organizational goals. For example, the template process map may need to be tailored to integrate a specific computer application workflow or project teamwork sequence.
A Detailed BIM Use Process Map includes three categories of information which are represented on the left side of the process map and the elements are included in the horizontal lines (referred to as ‘lanes’ in the BPMN mapping notation):
1. Reference Information: Structured information resources (enterprise and external) required to execute a BIM Use
2. Process: A logical sequence of activities that constitute a particular BIM Use
3. Information Exchange: The BIM deliverables from one process which may be required as a resource for future processes
To create a Detailed Process Map, a team should:
1) Hierarchically decompose the BIM Use into a set of processes
The core processes of the BIM Use need to be identified. These are represented by a ‘rectangular box’ symbol within BPMN. These are placed in sequential order within the Process swim lane.
2) Define the dependency between processes
Next, dependencies between the processes are defined. This is accomplished by defining the connections between processes. The project team needs to identify the predecessor and successor of each process. In some cases, it may be possible to have multiple successors and /or predecessors. These processes are then connected using the ‘sequence flow’ lines in BPMN.
3) Develop the Detailed Process Map with the following information
a. Reference Information: Identify the informational resources needed to accomplish the BIM Use in the ‘Reference Information’ lane. Examples of reference information include cost databases, weather data, and product data.
b. Information Exchanges: All the exchanges (internal and external) should be defined in the ‘Information Exchange’ lane. These exchanges are further detailed out in Chapter Four.
c. Responsible Party: Identifies the responsible party for each process. Figure 3-4 displays how to represent this information in the process map.
4) Add Goal Verification Gateways at important decision points in the process
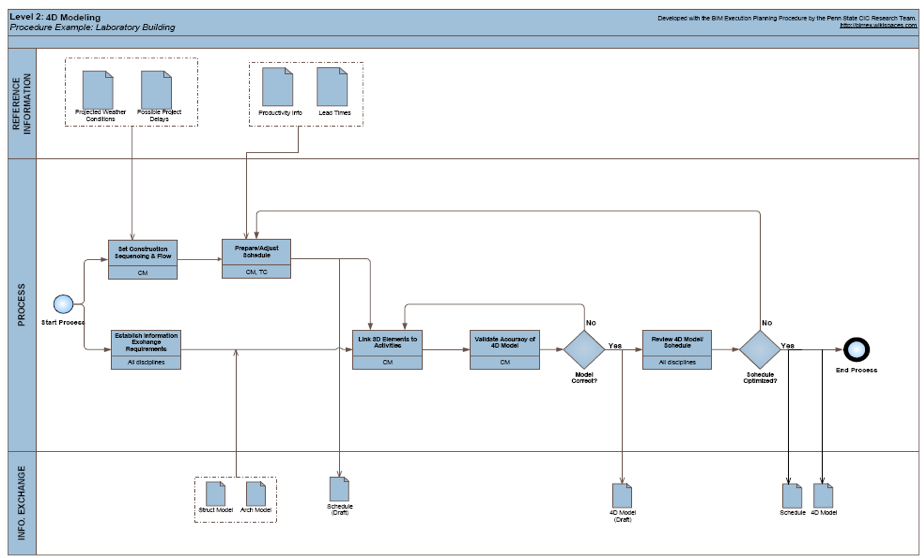
A gateway can be used to ensure that the deliverables or results of a process are met. It could also modify the process path based on a decision. Gateways provide the opportunity for the project team to represent any decisions, iterations or quality control checks required before the completion of a BIM task. Figure 3-4 demonstrates how this can be accomplished within a Detailed BIM Process Map (Level-Two Map).

5) Document, review and refine this process for further use
This Detailed Process Map can be further used for other projects by the project team. It should be saved and reviewed at various times throughout the BIM Implementation process. Throughout the project, detailed process maps should be updated periodically to reflect the actual workflows implemented on the project. Additionally, after the project is completed, it may be helpful to review the process maps to compare the actual process used versus the planned process. It is likely that the detailed process maps can be used on future projects. Please reference Figure 3-5 for an example of a Detailed BIM Use Process Map.

Symbols Used for Process Map Representation
For BIM Execution, the preferred notation for process mapping development is the Business Process Modeling Notation (BPMN) developed by the Management Group. One of the key elements of the BPMN is the visual appearance of the process map in terms of the symbols and markers used. These should conform to the shapes defined in BPMN specification.
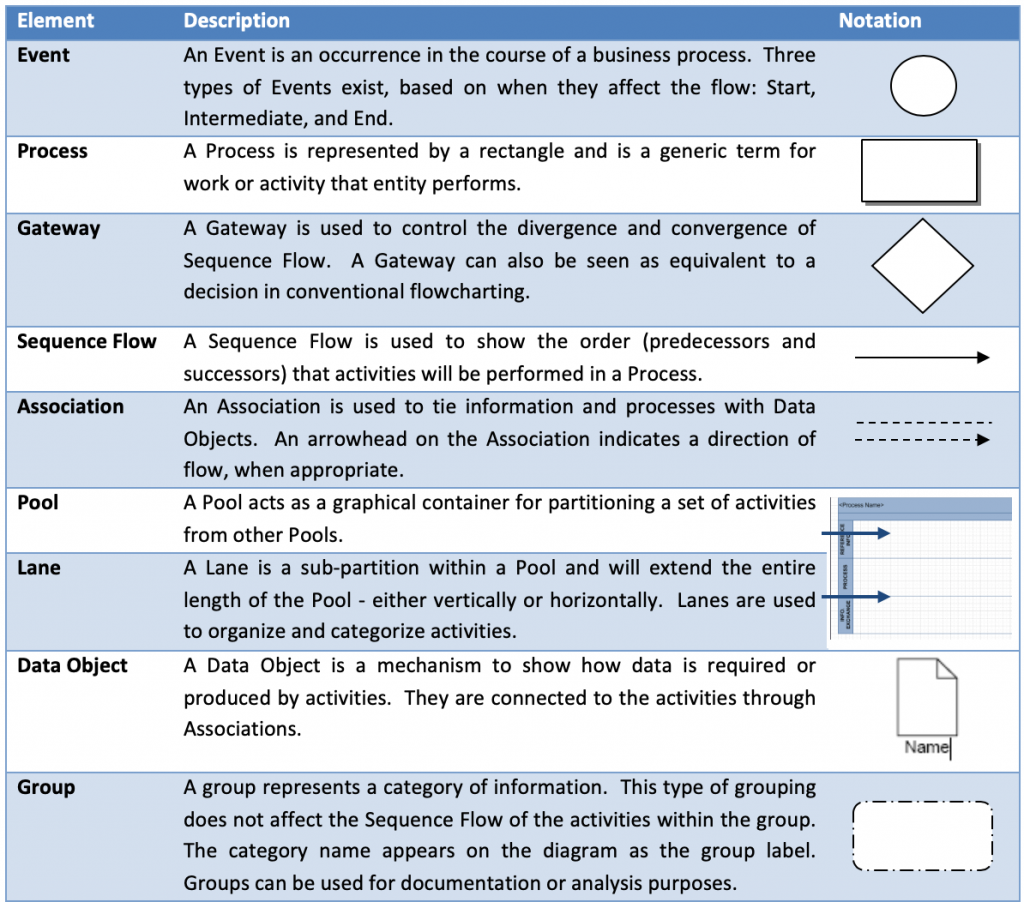
To develop a Process Map for the BIM Plan, the following symbols may be used:
Table 3.1: Process Mapping Notation for BIM Process Maps


