5 Annotation with Hypothesis
You might be familiar with Hypothes.is as a web annotation tool that you use through a browser extension, or by pasting a link in on their website. Now, you can harness the annotation power of Hypothes.is in Pressbooks. The annotator now comes built into core Pressbooks. You can use Hypothes.is as an annotator for editing groups working on a book, to handle peer review, and even as a classroom tool for students.
In this chapter, you’ll learn how to:
- Activate Hypothes.is for your Pressbook
- Register for a Hypothes.is account
- Annotate
- Create annotation groups
- Review annotation activity
- Access additional Hypothes.is resources
Activate Hypothes.is for your Pressbook
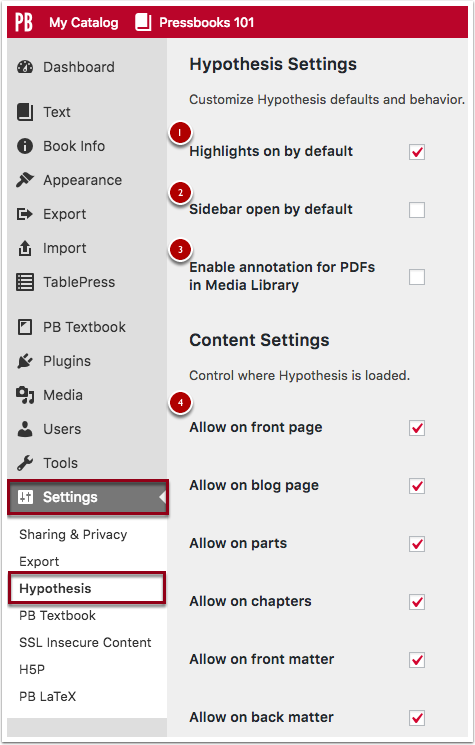
By default Hypothes.is is not activated in your Pressbook. In order to turn on the annotation tool, click Settings on the right-hand menu, then click Hypothesis. This will load the Hypothesis Settings Page.
The Hypothesis Settings menu includes:
- Highlights on by default – check this box if you want the annotation highlights to be turned on by default for your book.
- Sidebar open by default – check this box if you want the annotation pane to be open by default on your book.
- Enable annotation for PDFs in Media Library – check this box if you want to enable annotation for PDFs in your media library.
- Content Settings – these check boxes control where Hypothes.is is loaded on your book. They include the front page, blog page, parts, chapters, front matter, and back matter.
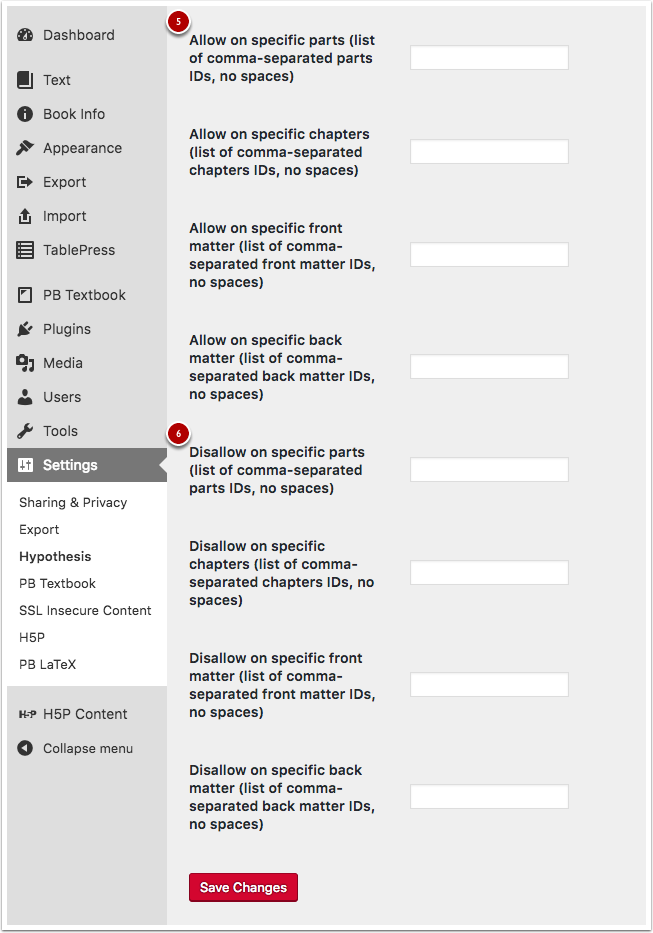
- Allow – these fields allow you to apply Hypothes.is to specific parts, chapters, front matter, and back matter.
- Disallow – these fields allow you to turn off Hypothes.is for select specific parts, chapters, front matter, and back matter.
Register for a Hypothes.is Account
To use Hypothes.is you’ll need to register for an account. To do so you’ll need to provide a username, email address, and password, and then click the Sign Up button. After that, you should receive a confirmation email with a link to click to validate your account. If you don’t see this email check your Spam or Junk folder. [1]

Annotation
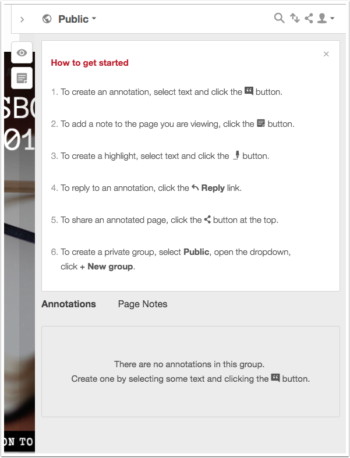
The first time you log into your Hypothes.is pane the How to Get Started box is displayed. It offers explanations of the different button functions and briefly how to use them.
To create an annotation or highlight, start by selecting the text and then choose either annotate or highlight. Choosing annotation will open the annotation pane to a new blank annotation field. Selecting highlight will highlight the text you have selected.

Annotation Pane Tour
- Filter, Sort, Share, and Account buttons
- Turn on/off highlights, create annotation buttons
- Text editor formatting tools – bold, italic, quotation, link, media, LaTex, numbered list, bulleted list,
- Preview annotation
- Tags Field – add multiple tags separated by commas
- Post button – you can use the drop-down button to easily switch between Public, Private, and Group posting
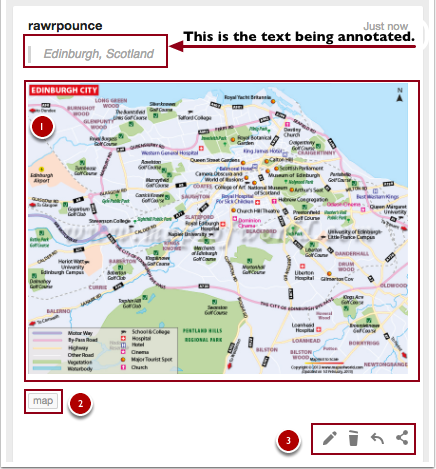
Once you’ve created an annotation it will appear in the annotation pane on the right side of the page. It features the text that you’ve selected to annotation at the top, your annotation, and tags.
In the screenshot below, draw your attention to (1) the annotation, in this case, I’ve provided a map of Edinburgh, Scotland to show other users what the city’s layout looks like, (2) what tags look like when you use them on an annotation, (3) the edit, delete, reply, and share buttons.
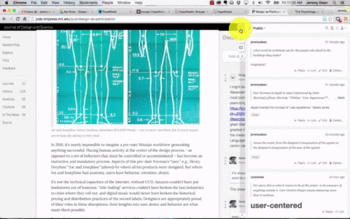
You can also adjust the width of the annotation pane by dragging it to left (wider) or to the right (narrower).
 Creating a Group
I recommend following the Hypothes.is Creating a Group step-by-step guide video tutorial. While it displays annotation on a web page, it is accessed through the Hypothes.is panel the same way it would be on a Pressbook.
Joining a Group
I recommend the following Hypothes.is Joining a Group step-by-step guide video tutorial. This might be helpful to show students if you’re using a group to manage class annotations.
Review Annotation Activity
Once you’re the member of a group, you can easily review the annotation activity for that group.
To navigate to the annotation activity for a specific group, open the annotation pane on your book and select the user icon to open the drop-down tray of options, then click on your username.
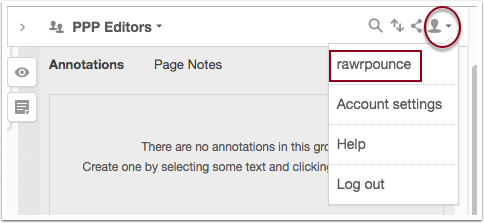
This will load your account page, from there click Groups and from the drop-down tray select the group you want to review. For example, in the screenshot, the PPP Editors group is selected.
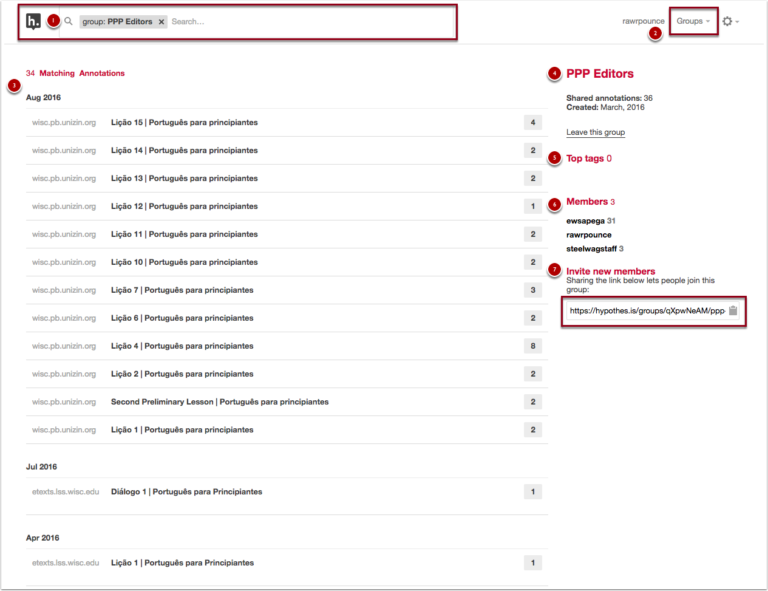
 This will load the group page that you’ve selected. At the top of the page you’ll find (1) the group you’ve selected as a filter in the search box, (2) the account and group navigation options in the top right of the page, (3) a listing of the matching annotations for the group tag, (4) the name of the group and group information, (5) a listing of the top tags for the group, (6) a list of members in the group, and (7) the link to invite new members to the group.
Resources
Hypothes.is offers some great resources for using annotations with students and in groups. Check out the following resources:
Back to School with Annotation: 10 Ways to Annotate with Students – offers 10 creative ways to use annotation with your students.
Annotation Tips for Students – offers tips aimed towards helping students complete annotations.
Hypothes.is Education – offers more guides and classroom examples for using Hypothes.is.
You can also check out the Hypothes.is YouTube channel tutorials.
- In the future, we hope to have a single sign-on using Wisc NetId. ↵


