
5 Lab 02: BODY MECHANICS
LAB OBJECTIVES:
- Define the term body mechanics.
- Describe proper body mechanics to use for lifting, reaching, pushing, pulling, and carrying objects
- Explain the importance of gravity, friction, base of support, center of gravity, and line of gravity as factors in good body mechanics.
- Demonstrate proper body mechanics for lifting, reaching, pushing, pulling, and carrying objects
- Instruct another person to use proper body mechanics using effective communication
- Explain specific precautions to use when lifting, reaching, pushing, pulling, and carrying objects
ROADMAP:
PRELAB ACTIVITIES:
- View the PPT that accompanies “Lab Video 2: Body Mechanics”.
- View the imbedded videos from this accompanying PPT
- Print this accompanying PPT for notes as you then…
- View Lab Video 2.
- Read the following Body Mechanics Chapter and complete Activities
- Print your completed lab activities for class.
Body Mechanics Lab and Quiz preparation
Skills Check:
SKILL EVALUATION – BASIC BODY MECHANICS
The student will correctly perform the proper techniques in a safe and effective manner in accordance with the following criteria. The student is required to demonstrate competency for all criteria.
- Introduction
- Student introduction provided to instructor.
- Procedure(s) explained in a clear and concise manner to instructor.
- Explain specific precautions to use when demonstrating lifting tasks
- Demonstrations: Application of Body Mechanics Principles
- Keeps center of gravity low and base of support wide while lifting
- Exhales with exertion
- Maintains correct posture during all lifts
- Steps to pivot, does not twist during lifts
- Lifts are planned: Area is free of obstacles.
- Lifts are completed in a smooth, non-ballistic manner.
- Demonstration: Application of Correct Body Alignment during:
- Sitting
- Standing while carrying an object
- “Push”, “Pull” and “Reach” positions
- Demonstration: Lifting Models:
- Traditional lift
- Deep squat – Power lift
- Half kneeling lift
- One-leg stance lift
- Stoop lift
You can access this skills check handout in Canvas.
You can access this skills check handout in Canvas.
Introduction:
You will, as a PTA, spend considerable time lifting, reaching, pushing, pulling and carrying objects. Additionally, you will be spending considerable time on your job seated, completing your documentation.
Your knowledge of body mechanics will not only keep you healthy and at a much-reduced risk for injury but will greatly enhance your ability to help your patients. Let’s take a look at a topic you might not think about too much.
Operational Definitions (Terms to know first)
Gravity: Gravity affects our posture and therefore our body mechanics. There are three principle of gravity that we need you to appreciate:
- Your Center of Gravity (COG): This is an area which is your ‘balance point’. For the human body, it is found anterior to the second sacral segment…a concept we will review in lab. When I keep my center of gravity over my base of support, the forces on my spine are at their lowest and my balance is at my best. Additionally, when I lower my center of gravity, I increase my stability.
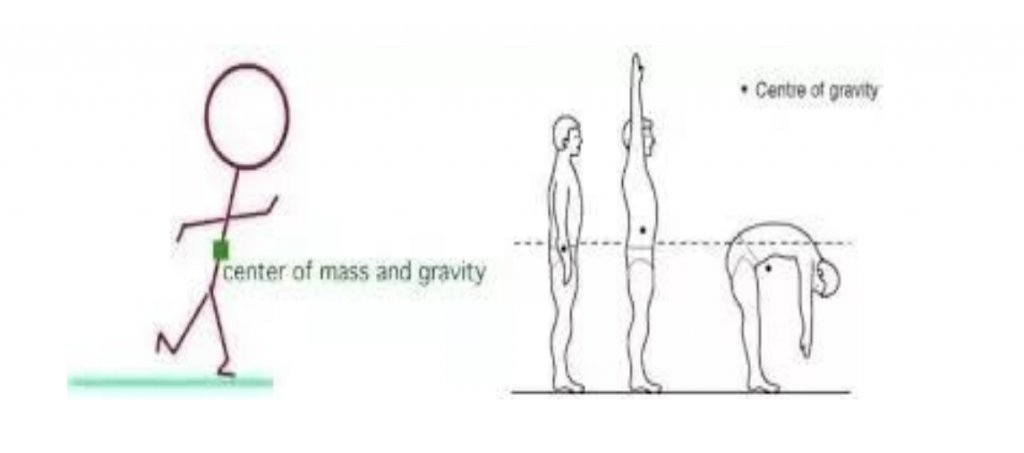
Center of Gravity - Base of support (BOS): Your BOS could be your feet, or it might even be your seat (buttocks) when in a chair. To increase your stability, we widen your base of support: A wider stance when standing, a wider chair when sitting.
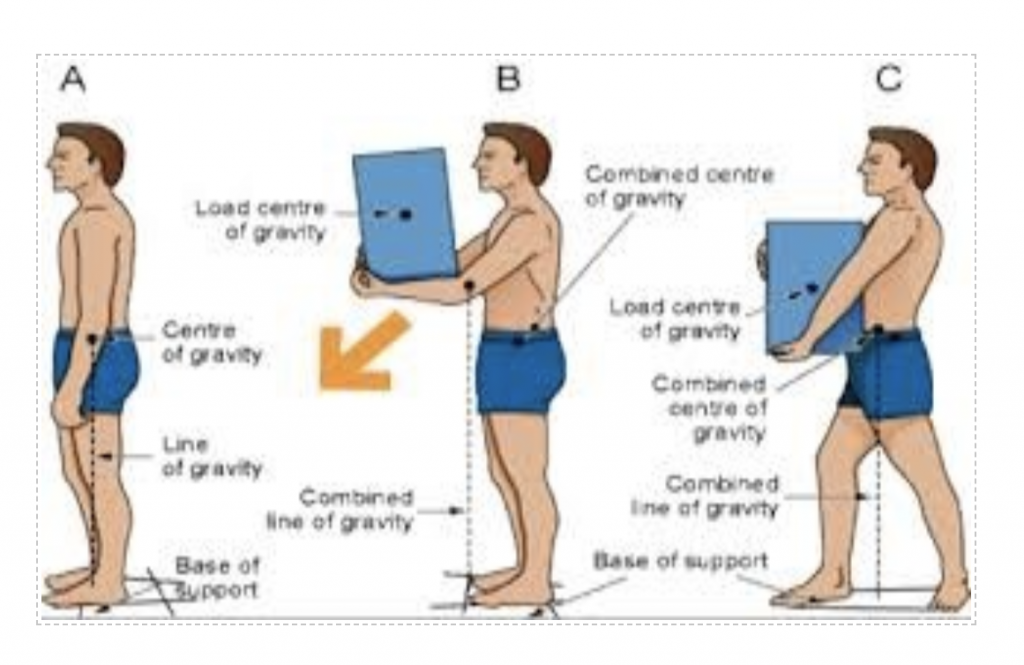
- Vertical Line of Gravity: The vertical line of gravity indicates the direction gravity influences its force upon us. As per the picture below: The vertical line of gravity is drawn directly through the body (going directly through the COG). When we lift / carry an object, that object becomes part of ‘our’ mass and changes our COG (bringing it, as in the picture) farther forward. What is important to remember is that the further away from our body we carry an object, the greater the further the vertical line of gravity is. This means the further away from our ‘actual COG’ the forces of gravity are working…meaning the load is more difficult to lift and will ‘pull’ us forward.
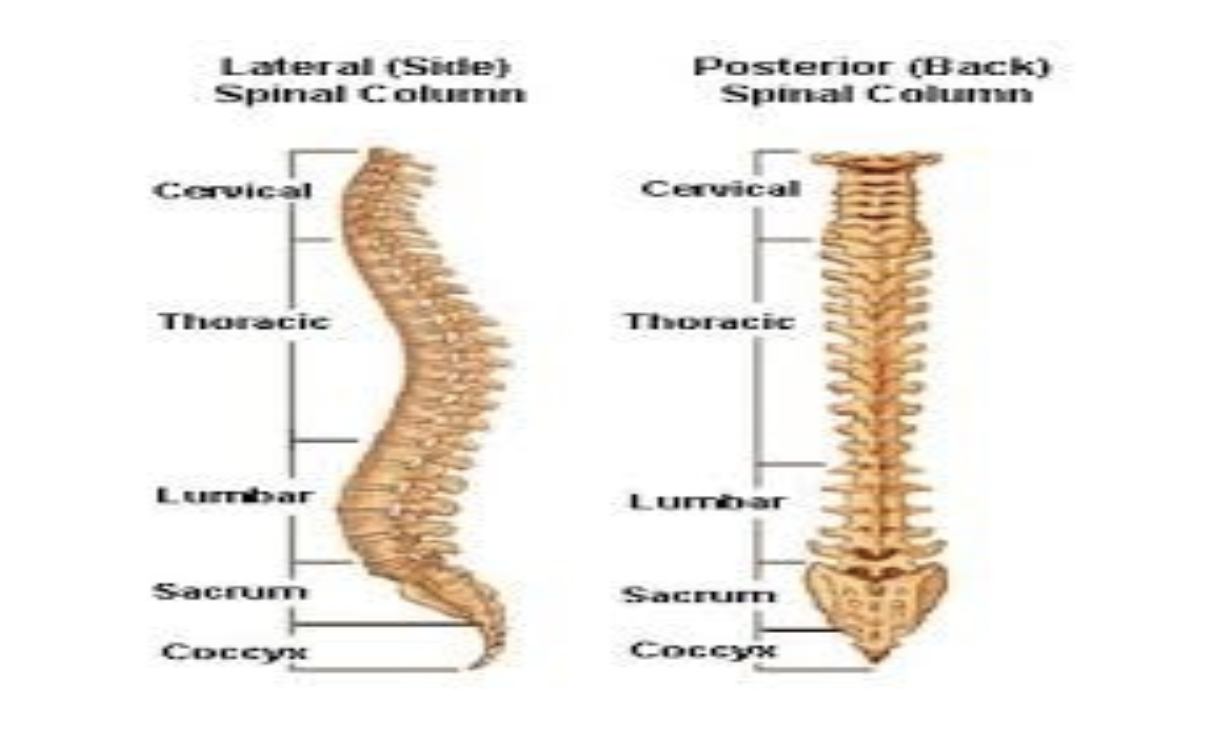
vertical line of gravity - Lordosis: Refers to the concavity of the lumbar and cervical curves. For PT100S, we will refer to these curves as having a natural concavity as opposed to describing them as being lordotic – as that is a term with multiple meanings.
- Kyphosis: Refers to the convexity of the thoracic spine. As with lordosis, we will refer to the convexity of the thoracic spine as having a natural convexity.
- Val Salva maneuver: The action of attempting to exhale with the nostrils and mouth, or the glottis, closed – in other words, the phenomenon of holding one’s breath while lifting an object. This increases blood pressure and is therefore not indicated or desired for our patients. Rather, we teach them to ‘exhale with exertion’

Val Salva maneuver - Anterior Posterior Pelvic Tilt: A position of the pelvis that increases the amount of concavity in the lumbar spine
- Posterior Pelvic Tilt: A position of the pelvis that decreases the amount of concavity in the lumbar spine
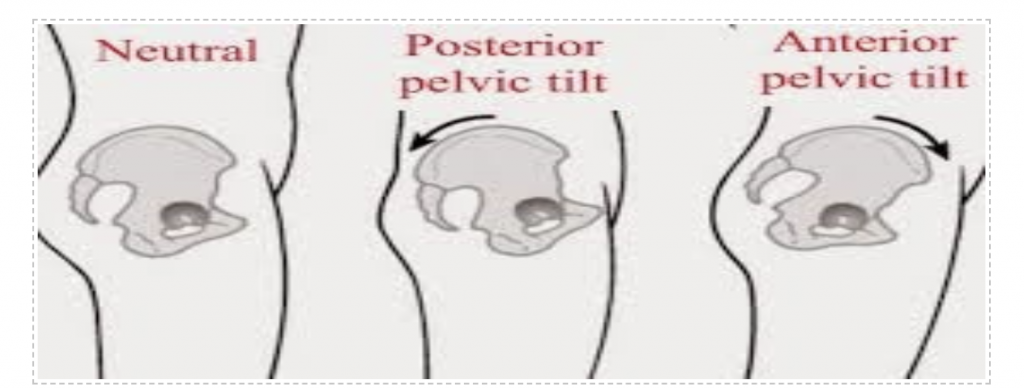
Posterior Pelvic Tilt


Back and Neck Pain Part I:
Many of us will, at some point, have back pain. Conservatively speaking, it is estimated that about one-half of all working Americans admit to having back pain symptoms each year. Additionally, just back pain alone (not neck or joint pain) accounts for about 264 million lost workdays in one year. A statistic that is commonly used is that up to 80% of the population will experience back pain at some time in their lives.
The big question is ‘why?’ Why, if we do know so much about exercise, anatomy and the role of prevention, why do we have so very many injuries to our back. Well, the answer may sound a bit like the answer we gave regarding the transmission of infectious diseases: It is the ‘invisible’ nature of the condition. You will soon learn that most incidents of back pain are not from a traumatic event, but due to something we call repetitive / cumulative trauma.
Maybe it is easiest to explain this by asking you to ‘freeze’ in place. Take a look at your posture as you are reading this text. Maybe you are seated upright with your spine in its natural alignment. However, maybe not. You all of us, as we slouch for hours per day…countless days per year….for many years….and with many of those hours being ‘stressful’ as well, it is not surprising that we develop spinal pain.
That pain emerges because, over time, we weaken our muscles of stability: We do this by over stretching them in our ‘slouching’ postures. Alternatively, other muscles become very tight because we have them in a shortened position for long periods of time. (This is called ‘adaptive shortening’).
At some point the consequences of this weakness and tightness can lead to pain: Either from just odd forces these muscle imbalances have on our spine or when we (strong though we think we may be) try to lift something (and find we are no longer quite as strong as we once were).
The good news is that while cumulative trauma does indeed result in many cases of back / neck pain it is preventable with ergonomic changes, exercise and lifestyle changes. You, as a physical therapist assistant, will be working with many patients for whom this diagnosis applies…and you will be greatly improving the quality of their lives through your interventions and education😊!
GUIDELINES: To assess seating posture, first look at pelvic posture.
Is it tilted in a way to allow the natural curves of the lumbar spine?
Are the feet flat on the floor so they can support the pelvis?
Are their arms supported or are they ‘pulling’ the patient in another direction?
Is their trunk supported or do they need to ‘slouch’ for their back to meet the backrest of the chair?
BUT WAIT, THERE’s MORE…
Back and Neck Pain Part II:
So, the other side of the back/neck pain coin is that many will develop their pain due to faulty lifting habits. When we pair poor posture with faulty lifting mechanics (body mechanics), we often develop an injury.
APPLICATION:
If we take the concepts regarding gravity, COG and BOS and integrate what we know about posture, we can create some guidelines for lifting. These guidelines are spelled out nicely in the imbedded video from our class. (https://youtu.be/zYF5BZyD6nE) However, a few points to expand upon:
-
- Begin with the end in mind: plan your move before you complete it.
- Assess the environment and the path you will be taking: Is it safe, dry, free from obstacles…
- Asses what you are moving/lifting/carrying: Is it stable, do you know its weight? If it is a human (as in a patient transfer), do you know all you need to know about the patient to complete a safe transfer? Doe the patient know their role. Are you able to communicate clearly with the patient in a way they understand you?
- When you do execute the lift or transfer:
- When possible, test the load first
- eep the object’s or patient’s COG close to your COG:
- Maintain the natural concavity of the lumbar spine.
- BOS: comfortably wide.
- Keep your head up Tight ‘core’ muscles
- Avoid the Valsalva maneuver
- Resist (the urge to) twist your spine: Step and pivot; no twisting
- Begin with the end in mind: plan your move before you complete it.
LAB ACTIVITIES:
We will be performing and skills checking the following types of lifts in lab.
- Deep Squat: Knees > Hips.
- Power Lift: Hips > Knees.
- One-Leg Stance: “Golfer’s Lift”. For LIGHT Objects.
- Half Kneeling: Place the object on your thigh
- Traditional Lift: Object is above your waist. Example: Box on table
- Stoop Lift: For an object on the floor: Suitcase or briefcase
- Push – Pull: Stride position: For moving a Hospital Bed.
- Two-person lift: Communication Positioning a patient in bed.
- Overhead lift: Stride position Reaching overhead for dishes
Quick Check Activity
- It is easier to carry an object when it is close to our trunk / far away from our trunk.
- I am more stable and less likely to lose my balance if my COG is higher / lower?
- I am more stable when my BOS is narrow / wide.
- The lumbar spine has a natural concavity / convexity
- To increase the natural curve that is present in the lumbar spine, I will increase the tilt of my pelvis anteriorly / posteriorly.
- I should not hold / hold my breath when lifting or carrying objects.
- The first thing I need to do before I lift an object is: Plan ahead / pivot rather than twist
- What might I tell the patient to do with their breathing when they are exerting themselves?
