
6 Lab 03: POSITIONING, DRAPING and an INTRODUCTION TO WHEELCHAIRS
LAB OBJECTIVES:
- Describe appropriate positioning of the trunk, head, and extremities with the patient supine, prone, side lying, or sitting.
- Recognize positions and postures that aggravate or relieve pain.
- Demonstrate appropriate draping of the patient.
- Identify areas at risk for skin trauma when positioning a patient supine, prone, side lying, or sitting.
- List reasons for using and applying proper patient positioning.
- Identify the basic components of a standard wheelchair.
- Correctly demonstrate dependent wheelchair mobility.
ROADMAP:
PRELAB ACTIVITIES:
- View the PPT that accompanies Lab Video 3: Positioning and Draping / Wheelchairs
- View the imbedded video ]
- Print this PPT for notes as you….
- View Lab Video 2.
- Read the following Positioning and Draping with Introduction to Wheelchairs Chapter and complete Activities
- Print your completed lab activities for class.
Positing and Draping Lab and Quiz preparation
Skills Check:
SKILL EVALUATION – Positioning, Draping and Wheelchair Management
The student will correctly perform the proper techniques in a safe and effective manner in accordance with the following criteria. The student is required to demonstrate competency for all criteria.
- Introduction:
- Student introduction provided to instructor.
- Procedure(s) explained in a clear and concise manner to instructor.
- Explains the benefits of correct positioning for the head, trunk and extremities.
- Explains reasons for proper draping of patient for patient care
- Demonstration:
Applies principles of positioning to protect areas at risk for skin trauma in the following positions:- Supine
- Sidelying
- Prone
- Seated
- Demonstration:
- Correctly drapes mock patient for a given treatment intervention
- Basic components of standard wheelchair
You can access this skills check handout in Canvas.
Operational Definitions:
Positioning: Patient positioning is the art of maintaining a patient’s neutral body alignment by preventing hyperextension and extreme lateral rotation to prevent complications of immobility: Contractures and skin breakdown.
Draping: The art of positioning a patient such that only the body part/area to be treated is exposed. Draping also includes assuring the patient’s modesty and physical comfort.
Contractures: a condition of shortening and hardening of muscles, tendons, or other tissue, often leading to deformity and rigidity of joints.
Skin Breakdown: An injury to the skin (our largest organ) that results from a lack of blood circulation. This occurs primarily when a boney prominence is in direct contact with a surface for a period. Breakdown can also be caused by friction: For example, when a patient is repositioned in bed, friction may develop from any body part not correctly supported or lifted during the repositioning.
Introduction:
According to Chandan et al: “In the United States, chronic wounds affect around 6.5 million patients. It is claimed that an excess of $25 billion is spent annually on treatment of chronic wounds.”
You might be thinking that, well, wounds just happen to old people who can’t heal well following a surgery…or maybe this statistic is referring to wounds from auto accidents or fires when the patient has the wound for a long time. While you are correct, you are far less correct than you might think. In fact, many chronic wounds can be prevented. Yes, the theme of prevention appears yet again.
And here is another recurring theme: While you ‘may’ work with patients who have wounds (wound care), you definitely ‘will’ be working with countless patients on preventing wounds. Be it assessing their footwear, their orthosis or prosthesis or, to the point of our lab this week, their positioning while in bed or a wheelchair. Your assessment and intervention will prevent countless new wounds from developing – your patient may never know this, but, years from now when you retire, you can know that you prevented an unbelievable amount of suffering. Something to look forward to. …so let’s get started.
What are the benefits of proper positioning?
- Prevents soft tissue injury: Skin Breakdown
- Prevents Contractures
- Improves the efficiency of body functions
Soft Tissue injury:
We saw from the video / PPT, pictures like this one below, of skin breakdown that developed from pressure (AKA: Pressure Ulcers). While the bad news is that this is a painful condition that impacts the patient’s mobility, comfort, sleep and well-being, the good news is that most of the time, these are preventable.
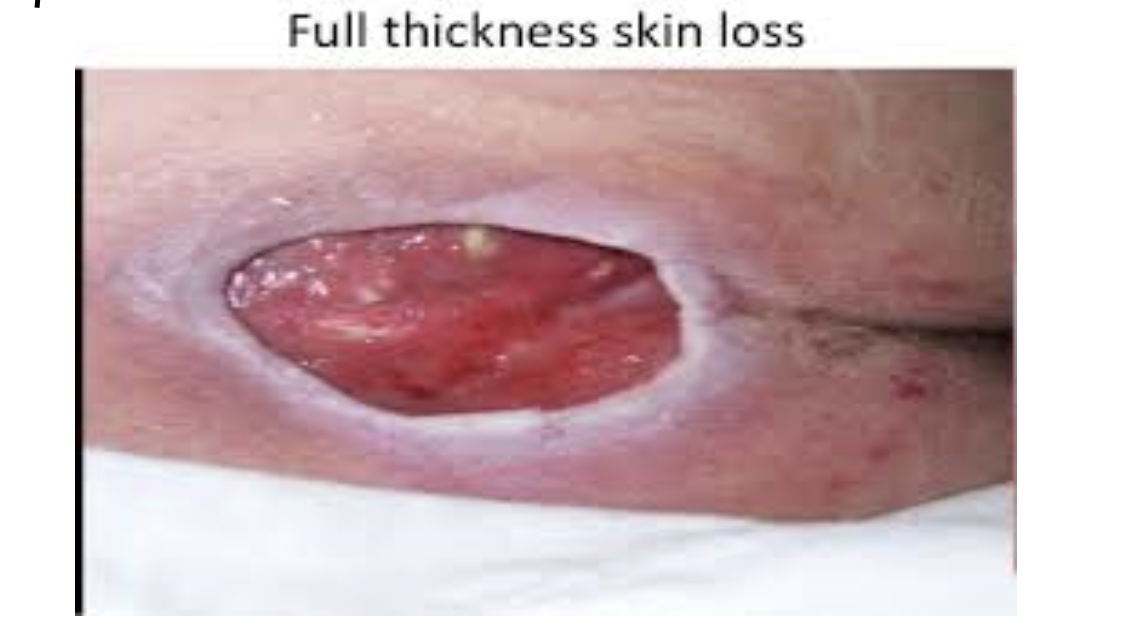
How do we prevent skin breakdown?
The first piece of information we need to know is where are they most likely to occur. That will help us focus our interventions. You will need to know this list by memory for PT100S as well as…. all other PTA classes and for the rest of your career. Take your time now to study and understand it:
Supine: Heels, Sacrum, Elbow, Scapula, Occiput, Head of fibula, lateral malleoli
Prone: Forehead, Acromion process, ASIS, patella,
Sidelying: Lateral malleoli, Greater Trochanter
Sitting: Ischial Tuberosities, Scapula, spinous processes, Medial epicondyles, Heels For Wheelchairs: Ischial Tuberosities, Scapula, Spinous Processes, Olecranon Process, Medical Epicondyles, Back of knees, Heels and Feet
Once we know where, we can then focus on “How”:
In lab, we will be using pillows and positioning techniques to keep pressure off this sites. Additionally, it is important to also understand that we will be educating patients, patient family members, nursing assistants, etc. on preventing skin breakdown. We will provide caregiver education in three areas:
- How to assess the skin using the blanching test: Press on the red, pink or darkened area with your finger. The area should go white; remove the pressure and the area should return to red, pink or darkened color within a few seconds, indicating good blood flow. If not, the patient has the beginning of skin breakdown.
- The importance of repositioning an immobile patient (or reminding a mobile patient) every two hours.
- How to use pillows etc., to reduce pressure on at-risk areas.
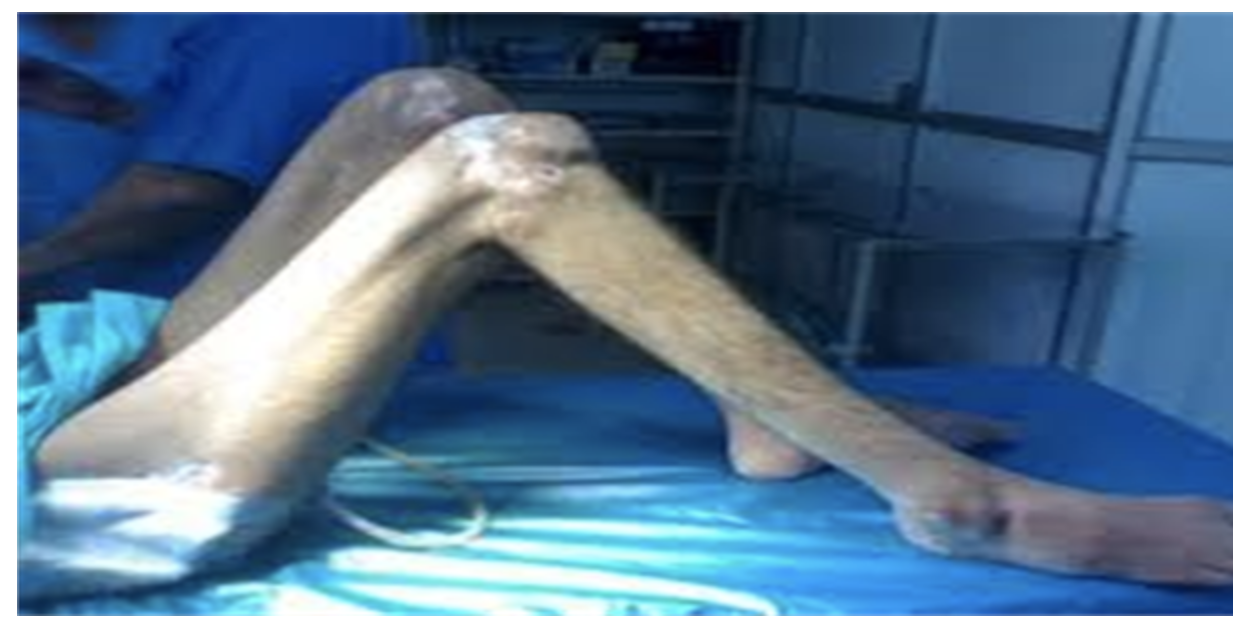
Contractures: Why prevention matters
Like skin break down, contractures are often preventable. You can imagine that, for a patient with contractures at her hips and knees (image below), the patient is a an even greater risk for skin breakdown on her heels or perhaps her sacrum as well. Think through this patient’s other problems too: How well do you think she would walk if her legs are permanently flexed in this position – and how that impacts her ability to get a shower, go to the bathroom, eat at a table, go for a car ride…and so on. As advocates for our patients, we need to do all we can to prevent contractures.
How do we prevent contractures?
Positioning, education and exercise. Seems simple, huh? Unfortunately, it isn’t always so.
Positioning: As we will see in lab, even when we have our patient positioned ‘just so’, they may wiggle out of the desired position into one placing them at risk for a contracture. This begs the question, why would a patient wiggle out of a position to begin with?
Often the answer is multi-factorial: Pain, anxiety, confusion, a need to go to the bathroom, and so on. If we can think ahead and address as many of those areas as possible, our patient is less likely to seek the fetal position: Flexion of the trunk and extremities.
Exercise: Contractures develop due to the lack of motion. Exercise is the opposite: Exercise is motion😊! So, any exercise / activity we can introduce to the patient (ankle pumps, leg lifts…encouragement to roll side to side) will really help reduce the risk of contractures.
Education: We can’t stress enough that the more we communicate with our patient (and their caregivers) the more likely we are to be successful with the positioning element of prevention. If all involved appreciate the goals for care, the more likely they will be achieved. Never underestimate the power of education.
Can you think of some motions that would help this patient reduces their contractures? Can you think of any you might not perform – and why?
DRAPING: Why it is Important

When we discuss draping in lab, we will talk about the benefits of draping: As it provides physical and emotional comfort. It allows the patient to ‘relax’ and not be self-conscious. The more self-conscious a patient is, the more likely they will be tense (not relax their muscles) and distracted by their ‘self-conscious’ thoughts; making it hard for them to follow directions.
Proper draping will do much to prepare your patient for treatment as well as be able to be a part of the treatment: Whether that means just to relax or preform given activities.
Please Note: We also want to be very aware of the environment we are working in. We do not want to be exposing body parts in the middle of a busy gym area. More on this in our labs.
AN INTRODUCTION TO WHEELCHAIRS:
As part of your PPT preparation for lab, you were asked to view and review the PhysioU videos regarding wheelchair parts and basic patient education. While you will learn a great deal about wheelchairs in your rehab class, it is essential at this point to understand but three things:
- The basic parts of a wheelchair: Their name and function
- The areas that are assessed for fitting a wheelchair to a patient
- Some of the consequences of a poorly fitting wheelchair
The basic parts of a wheelchair: Please be ready to identify and state the purpose of the following parts of a wheelchair. This will be included in your lab.
- Fixed or removable arm rests: Why are there choices?
- Fixed or removable leg rests: Again, why are there choices?
- Front caster wheels and Heel / toe loops: Where are they?
- Elevating leg rests: What type of patient may need these?
- Brakes – locks: How will we know they are engaged?
- Wheels – handrims: Which does a patient use to propel the chair?
AREAS THAT ARE ASSESSED FOR FITTING A WHEELCHAIR TO A PATIENT
- Arm rest height: Influences on their shoulder position and their ability to propel the chair.
- Seat height: Can the patient’s feet reach the footrest or (if they are propelling the chair) the floor?
- Seat width and depth: The seat depth should be two inches away from the back of the knee to avoid blood vessel constriction in the legs.
- Wheelchair back height:
- Back height is the distance from the top of the back portion of the seat to the bottom. It is determined by measuring the distance between the seat of the chair to the patient’s axilla and subtracting four inches. A quick way to check is to see if you can fit four fingers between the top of the seat and the patient’s axilla. (Fairchild, 136-137).
CONSEQUENCES OF POOR WHEELCHAIR FIT:
- If the pelvis is not positioned correctly, the patient may slouch. This will cause the patient to be seated on their sacrum: Sacral Sitting. This can quickly lead to sacral breakdown.
- If the backrest is too high, it may cause the patient to flex at the trunk; too low and they may be unstable if they try to propel the wheels.
- If the arm rest are too high, they will have difficulty propelling chair (and be uncomfortable)
- If the arm rests are too low, they will have difficulty pushing from them to stand (or flex at the trunk while seated).
The Role of the PTA:
We will talk much about the role the PTA has in patient care. You are not an exercise tech or a gym assistant. You will be an integral member of the healthcare team. You will be required to communicate constantly with your PT and other therapy colleagues (as well as the patient and their family).
To that end, we want you to know, right now in the first semester, that you, as a PTA will be monitoring the response o patient has to a treatment (or to a position) and you then be responsible for modifying or adjusting it to best fit the patient. In situations when that cannot be done, you will be communicating directly with your PT.
APPLICATION ACTIVITY:
Please be ready to perform this activity in lab.
You are at your first clinical affiliation site; a SNF. Your first patient for today is a an 85 yof s/p right hip ORIF following a fall at home. She spent 3 days at the acute care hospital and was deemed medically stable, but not strong enough to return to her home – a small cottage at a retirement center.
Her RLE is weak (3/5) and edematous. However, d/t hip pain, she is choosing to position herself in bed with both of her knees/hips in flexion. You are to see her bedside for your first treatment. You want to show her a way in which she can be positioned in bed to avoid skin breakdown and avoid getting a contracture.
- Identify yourself to the patient and obtain permission for treatment per PSU PTA protocol that we will go over in lab.
- Identify possible positions for the patient. What will you be looking for regarding skin break down prevention and contracture prevention in EACH position?
-
- Supine.
- Sidelying
- Seated in w/c.
You will then drape the patient so that the patient will be comfortable exposing her RLE while exercising this extremity.
REFLECTION ACTIVITY:
Go to canvas to access the downloadable worksheet or respond in your notebook and bring to lab class.
- What are the most important elements in preventing a contracture for a bedbound patient?
- Please identify the two areas noted that might cause a patient, who is seated in a wheelchair, to flex forward at the waist.
